How to Process a Shopify Refund: A Complete Guide

Do you want to better understand the Shopify refund process, but don't know where to start? Maybe you've experienced:
- Not knowing when to give full refunds vs. partial ones
- Getting confused about refunding orders that used discount codes
- Being unsure whether to refund shipping costs or not
Refund issues happen to a lot of Shopify merchants. If you handle them the wrong way, it can mean lost revenue, negative reviews, and customers who may not shop with you again.
The good news? You don't have to go through the same fate. We'll help you get refunds right from the start with step-by-step instructions and best practices you can follow.
Let's learn more about Shopify refunds first: what they are, the different types, and why they happen.
Understanding Shopify Refund
What is a Shopify Refund?
A Shopify refund is when you return money to your customer after a purchase. It can be in full or partial amounts, and it's usually processed when something went wrong with their order.
Shopify makes the refund process manageable through your admin panel. Here, you can send refunds through Shopify payments and adjust quantities or amounts easily. And if you’re wondering if “refunds” are the same as exchanges and store credits, the answer is no.
Refunds work a bit differently because you send actual money back to the customer's original payment method and lose sales revenue.
With exchanges and store credits, you retain revenue while satisfying customers.
Why You Might Need to Issue a Shopify Refund
Damaged products, wrong sizing, and delayed shipping are some of the common reasons why you have to process Shopify refunds. You have to do it to avoid customer dissatisfaction and prevent negative reviews that can hurt your store's reputation.
Let's talk about these scenarios, plus some more reasons you might face:
- Damaged or defective items: Your product broke during shipping or arrived with manufacturing defects that make it unusable.
- Wrong orders: You accidentally sent the wrong size, color, or a completely different product than what your customer ordered.
- Items don't match expectations: The item looked different from the photos you uploaded or didn't work as described on your product page.
- Shipping delays: The orders arrived so late that your customers didn’t need them anymore, or they’d already bought a replacement from a different shop.
- Customers changed their mind: The buyer simply decided they don't want your product anymore (even if there's nothing wrong with it).
While you can't prevent refunds from happening, you can make the process smoother (and improve customers' experience) with a clear refund/return policy.
A good policy is easy to understand and shows what can be refunded, how to initiate a refund, and the timeframe for returns. Here's a good example from Apple.
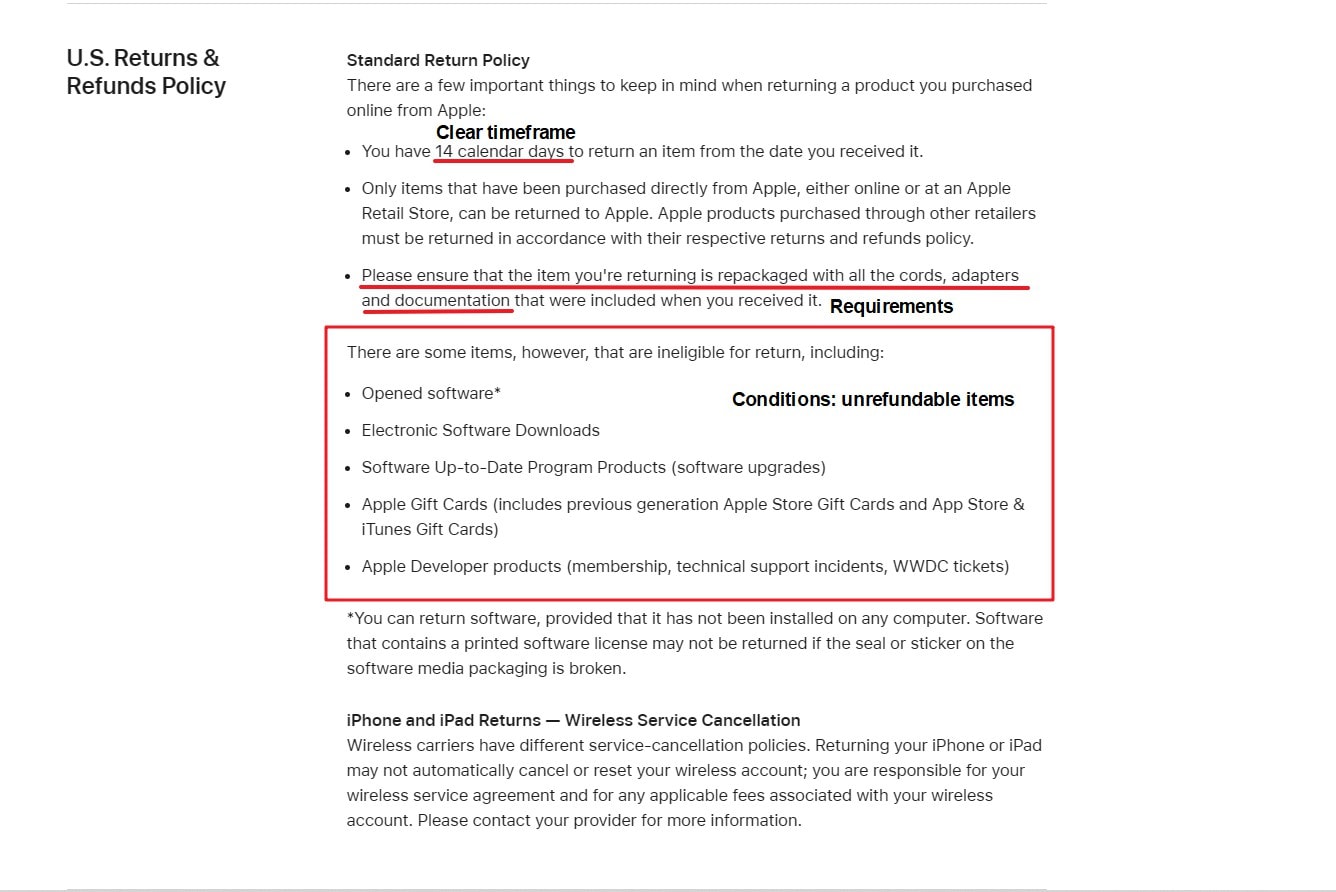
Doing this with your own policy can save you and your customers time and avoid any confusion.
Types of Shopify Refunds
Okay. Now that you know what Shopify refunds are and why you might issue one, it's time to talk about the types of refunds, including full, partial, and refunds for discounted orders.
Shopify Full Refunds
Full refunds mean returning 100% of the product cost to your customer. Sometimes it includes the shipping fees, taxes, and other charges, but it can also mean just the total item price.
Processing a full refund in Shopify is super easy. You have to choose the order you want to refund, click the "Refund" button, select the items or type the total amount, and then choose the refund method. That's pretty much it (but we'll walk you through the process later).
It depends on your store on when you'll initiate a full refund, but we recommend applying it ONLY for major problems that make your items unusable. Not for every tiny complaint... like you're giving out presents on Christmas day.
One of our clients only issues full refunds when products arrive completely broken, they ship the wrong item entirely, or there's a major delay that makes the order pointless (like camping gear arriving after the camping trip ended).
Shopify Partial Refunds
Shopify Partial refunds refer to returning a part of what your customer paid. The usual partial refunds range from 10%-50%, but it can be any percentage (from 1% to 99%) of the total amount.
Unlike full refunds that work for serious issues, partial refunds handle smaller problems that don't ruin the entire purchase. You can use these when your customers return individual items from multi-item orders, receive products with minor defects, or experience a slight delivery delay.
Refunds for Orders with Discounts
When a customer refunds a part of a discounted order, they often get back less money than they expect because Shopify spreads the discount across every item... instead of keeping it separate.
Let's say one of your customers ordered three polo shirts for $90 and used a $30 off coupon (they only paid $60). Shopify distributes $10 to each shirt, so when they return just one polo shirt, they only get $20 back, not the original $30 price.
But don't worry. If you want to be generous, you can easily adjust the refund pricing by yourself. It might sound complicated, but refunding discounted orders works the same as the two above.
That's what we'll show you next.
Step-by-Step Guide to Processing a Shopify Refund
Once you're ready to process a Shopify refund, you can follow these steps:
1. Locate the Order for Refund

- Log in to your Shopify admin and click "Orders."
- You can scroll down to find the specific order, or do the following for a faster search:
- Use the search bar and type in the order number or the customer's name
- Select some filters to narrow down by date, payment status, or fulfillment status
- Sort by recent orders if the refund request just came in
- Click the order to start the refund
PRO-TIP: It's best to check the order status to make sure the order is "okay" for refunds. Orders with "Fulfilled," "Partially fulfilled," and "Unfulfilled" are the only ones that can be refunded. Those with "Canceled" or "Refunded" status can't be.
2. Begin the Refund Process
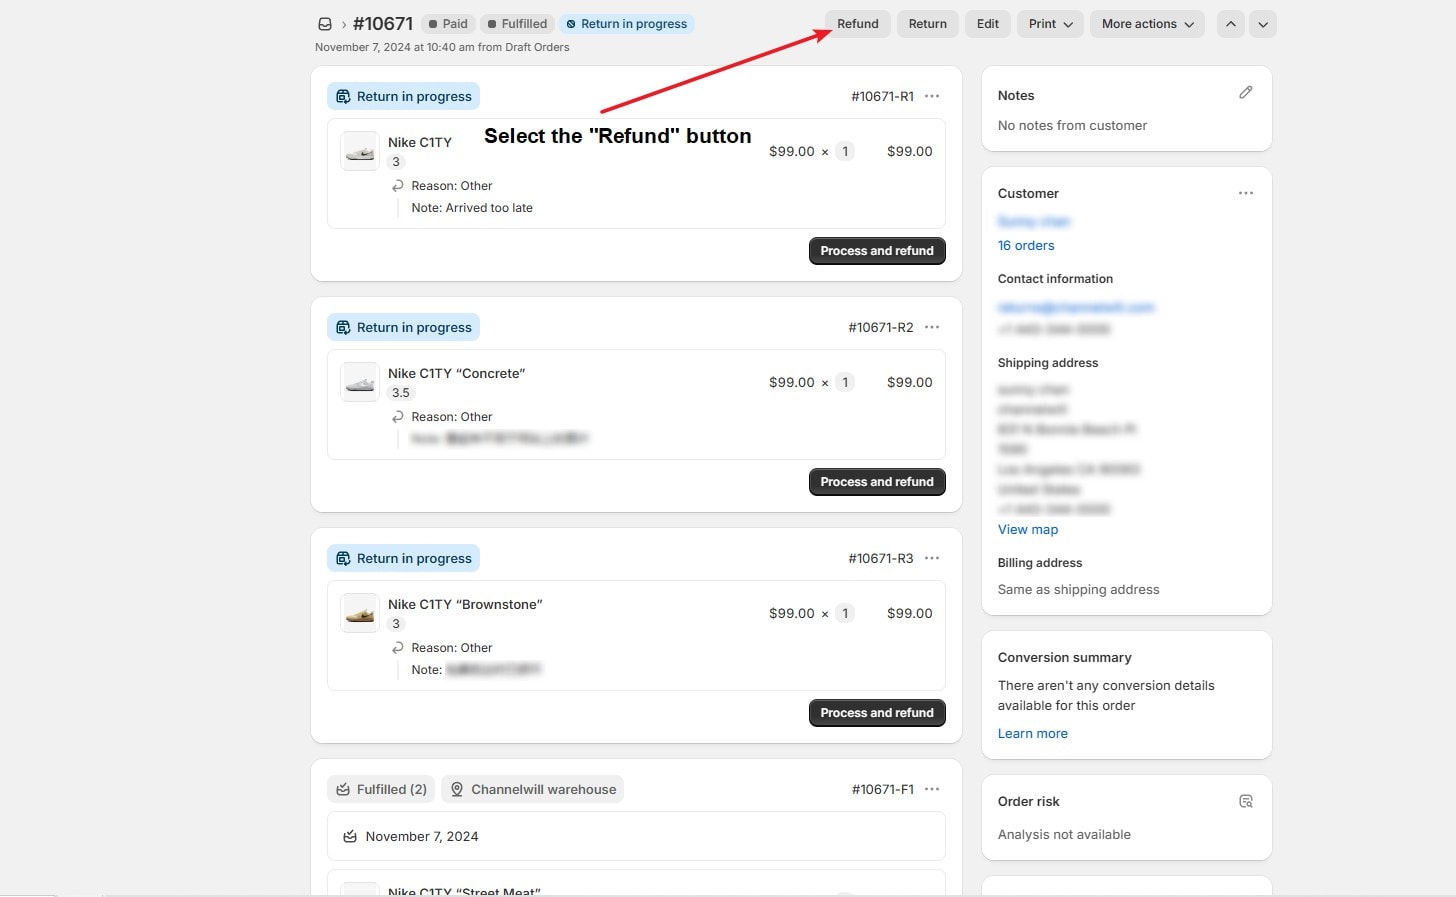
Now, select the "Refund" button at the top part of your desktop screen. You'll be directed to the return page for that specific order.
Shopify runs a few pre-refund checks that we want to mention. It verifies that you have the right permissions to issue refunds (store owners get this by default, but team members need permission for this). It also confirms if the customer's payment method can accept refunds back to it.
Some payment processors have restrictions that might affect your refund options. For example, if your customer's credit card has expired or been canceled since their purchase, you might need to choose store credit (which we highly recommend) instead of refunding to their original payment method.
If there are any issues, Shopify will alert you before showing you the refund page. Once everything is okay, the refund interface will load with all order items. And it's time to select the ones you want to refund.
3. Select Items and Quantities to Refund
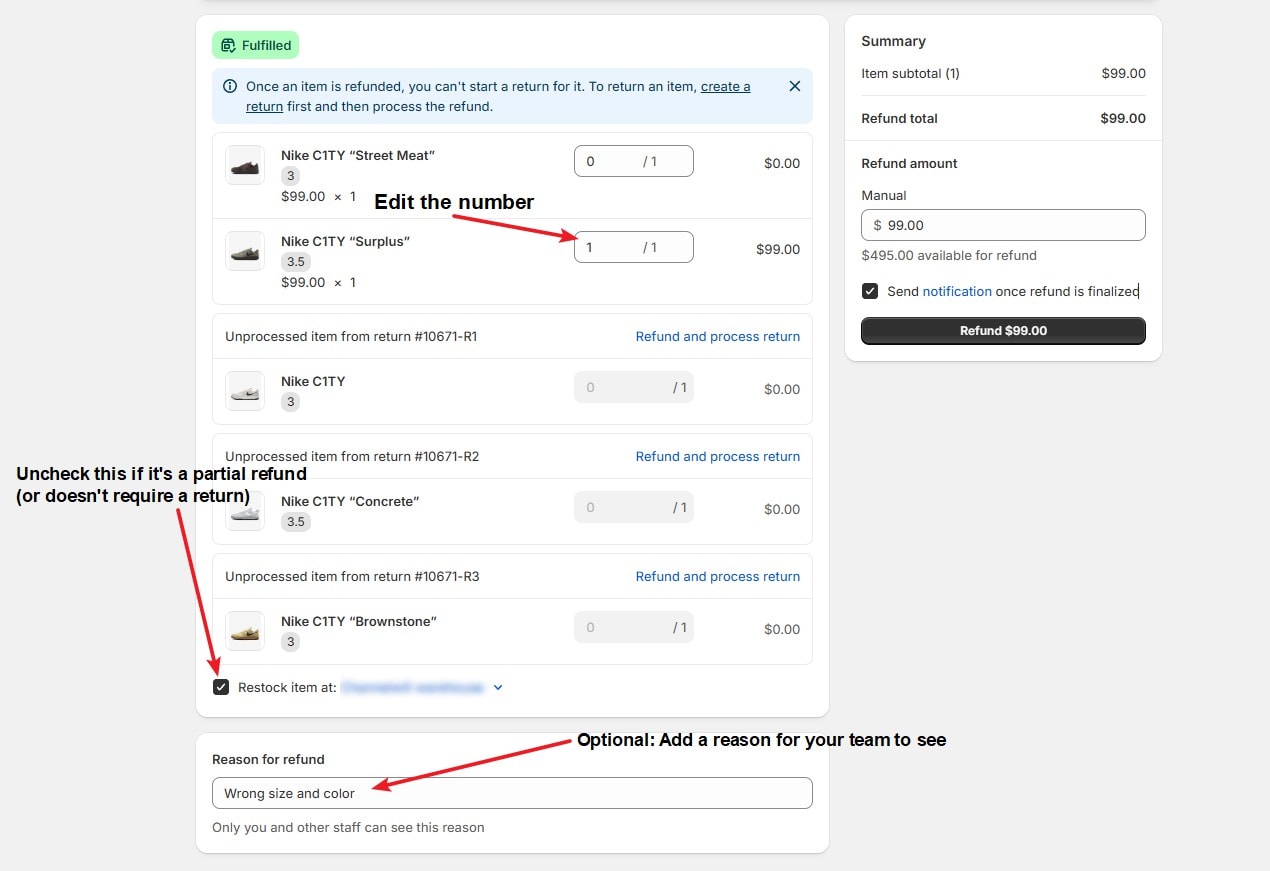
In the refund page, you'll see all the items from the order and quantity fields next to each one. Here's what you can do here:
- Change the numbers to match the refund requested by your customer. You can do that by typing the number or clicking the arrows inside the field.
- You can leave the quantity field to 0 for the other items you don't want to refund.
The "Restock items" checkbox is selected by default, and that means Shopify will automatically add returned items back to your inventory. You can uncheck this option when returned items arrive damaged and you can't resell them, or... when you're processing a partial refund.
PRO-TIP: Add a note under "Reason for refund" so you (and your team) can review why this return happened and avoid it in the future.
Learn more about the reason for return.
4. Adjust Refund Amounts for Specific Scenarios
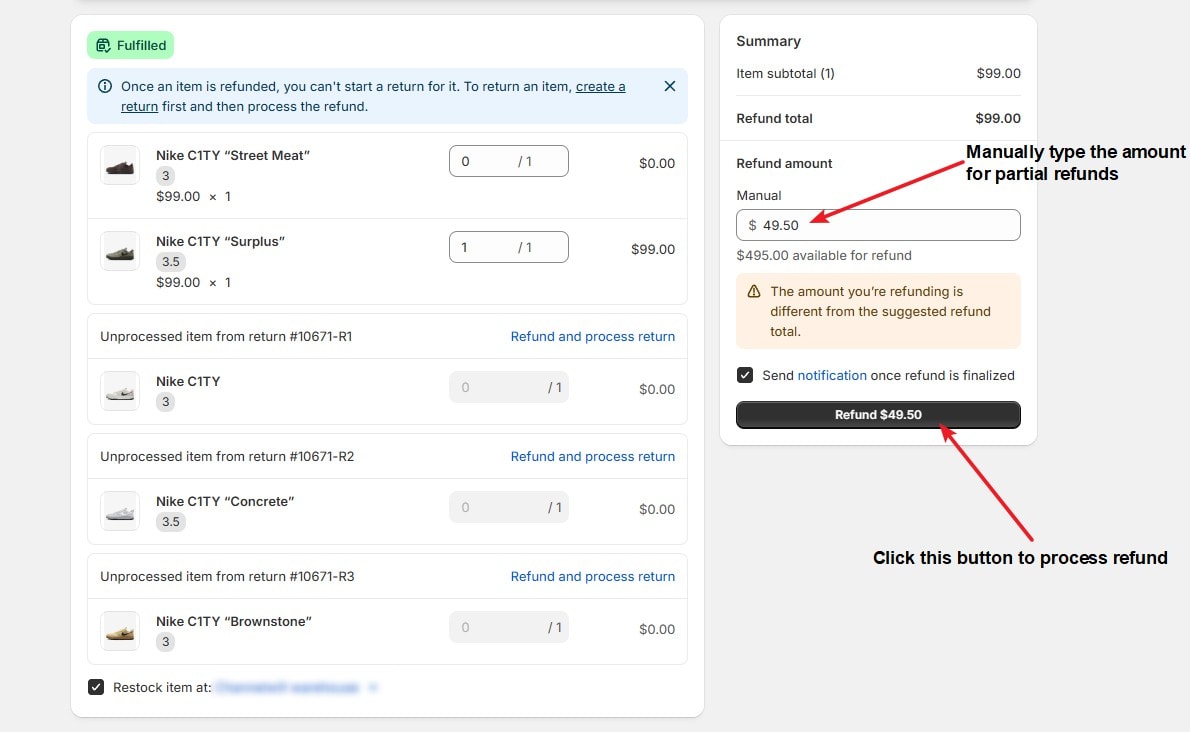
When you adjust the quantity for refund, the platform will automatically set it to the total price. For example, your customer bought two pairs of shoes at $99 in total, and you decided to refund one pair, Shopify will calculate $49.50 for that single-item refund.
But what if it's a partial refund request and you only have to return 50%? Easy peasy. You can click the field under "Refund amount" and type the price you want (that's $24.75). After typing the amount, select "Refund [X amount]" to process the refund.
That's it. You're done with the process!
PRO-TIP: Don't forget to check the "Send notification once refund is finalized" so your customer will know that their request has been successful.
Handling Shipping Costs in Shopify Refunds
Refunding Shipping Costs: When and How
Most stores refund shipping when they make a mistake (i.e., wrong item or damaged product), but not when customers simply "change their minds."
That's why it's important that your policy clearly provides different scenarios for shipping refunds and also sets conditions (for acceptable and unacceptable items). You have to cover situations like damaged items or incorrect orders vs. returns due to buyer's remorse.
Here's how you can refund shipping costs:
- Go to the order and click "Refund."
- Look for the "Refund shipping" section and check the "Shipping" box, then enter the amount you want to refund.
You can refund partial shipping costs, too. So, if the issue isn't your fault, but you just want to appease an angry customer, you can simply cover half. If the total shipping cost is $15... you can return $7.50 instead.
Managing Return Shipping Labels and Costs
So, who should provide the shipping label? Is it you or your customer?
We suggest you handle this to lessen the stress on your customers. It can positively help with the relationship and experience, but you can still set conditions on when you'll provide free return labels and when customers should do it themselves.
Shopify offers a free shipping label template you can use, but you'll need to buy postage separately. In this case, shipping platforms like Shippo and ShipStation work better because they automate label creation and provide tracking numbers automatically.
Important Considerations for Shopify Refunds
Here are some things you have to consider when processing Shopify refunds:
Refund Processing Times and Customer Expectations
Setting clear expectations upfront prevents most "where's my refund?" emails. So, it's important to mention how long refunds actually take when you process them.
Shopify refunds typically take 2-10 business days to appear in your customer's account, and that still depends on their payment method. For example, credit and debit cards usually process within 2-5 business days, while PayPal can take up to 10 days.
We suggest you send an email right after processing the refund to explain the timeline. A simple: "Your refund should appear within 3-5 business days in your credit card." will do wonders.
One of our clients used to receive a lot of emails because their customers didn't know how long the processing time took. Once they started sending timeline emails, those messages dropped by 60%.
Delays also happen due to bank reviews or payment processor issues. When this occurs, you have to reach out (before your customers contact you) with a quick update about it.
Impact of Refunds on Inventory Levels
When you process a refund for a physical product, Shopify automatically adds that item back to your available inventory.
Imagine you have 10 pairs of character socks in stock and sell 3. Your inventory drops to 7. If a customer returns one pair and you process a refund, Shopify automatically bumps up your stock to 8.
The system treats the returned item as new inventory that's ready to sell again. It's actually useful (especially if you process multiple refunds per week).
But remember this: you still need to pay attention to the actual condition of returned items. If a customer returns a damaged product that you can't resell, you'll need to adjust your inventory count to reflect the real situation.
Best Practices for a Seamless Shopify Refund Process
Setting clear refund policies, using a Shopify return app, and training your team members on refund procedures are some of the best practices we want to share with you. Let's talk about them in detail:
Setting Clear Refund Policies
Your refund policy should answer the three questions every customer has: what can be returned, how long they have, and what condition items need to be in. A well-written policy prevents most disputes before they start.
Include specific timeframes like "14 days from delivery," clear condition requirements like "items must be unused with original tags," and any exclusions like "final sale items cannot be returned." For example, one of our clients reduced refund-related emails by 60% just by adding a line about needing original packaging for electronics returns.
PRO-TIP: Display your policy where customers can find it. Add a link to your website footer, include it on product pages for expensive items, and add it to order confirmation emails. The checkout page is another smart spot since people are actively thinking about purchase protection at that moment.
Using Shopify Return Apps Effectively
Shopify's built-in return features handle basic refunds well, but return management apps can automate the process and cut your manual work significantly.
Here are the main benefits you'll get from using a dedicated return app:
- Self-service return portal: Customers start their own returns without emailing you first
- Branded return experience: Your return page matches your store design instead of looking generic
- Multiple refund options: Offer store credit, exchanges, or original payment refunds from one system
- Automated notifications: Your customers get status updates without you having to send manual emails
- Return analytics: You can see which products get returned the most and identify patterns in your data file.
Apps like our ParcelWILL (formerly ParcelPanel) Returns and Exchanges work particularly well for Shopify stores because they're built specifically for the platform.
ParcelWILL handles everything from the initial return request to the final payout, and customers can track their return progress just like regular shipments. This reduces the "where's my refund?" messages you receive.
You can also set up automatic approval rules (like auto-approving returns under $50) and offer flexible exchange options that can help you keep revenue instead of losing it to refunds.
Conclusion: Getting Shopify Refunds Right
That's it for this post. You now have the knowledge (plus a tool) to handle refunds. It's time to put everything into action and build a refund system that actually works for your business.
Remember that getting your refund process right can:
- Boost customer experience and turn frustrated customers into repeat buyers
- Save you time with clear policies and trained staff
- Protect your revenue while building trust
Install ParcelWILL Returns and Exchange to automate your refund process with multiple refund methods, flexible exchanges, and customizable rules that work for your specific business needs.
Shopify Refund FAQs
How to cancel and refund on Shopify?
You can cancel and refund on the Shopify admin through the "Orders" tab. Select a specific order, hit "Refund," select items, and adjust the amounts. After that, you can click the "Refund" button to complete the process.
Can I refund just the shipping on Shopify?
Yes. You can refund the shipping cost on the refund page. Simply check the "Shipping" box and enter the amount you want to refund.
Can I refund a shipping label on Shopify?
You can't get cash refunds for shipping labels, but you can void unused labels for account credit towards future purchases. Go to the order, find the fulfilled section, click the "..." icon, select "Void label," choose your reason, and confirm to get the credit applied.
How do I edit shipping and returns on Shopify?
For shipping, you can go to Settings > Shipping and delivery to manage rates and zones. For returns, you can select "Policies" under Settings to set up return rules (like return windows and fees) and your customer-facing return policy.


![Top 10 Route Alternatives & Competitors [2026]](https://blog.parcelpanel.com/wp-content/uploads/2025/11/Route-Altenatives.png)

![Top 10 parcelLab Alternatives & Competitors [2026]](https://blog.parcelpanel.com/wp-content/uploads/2025/11/AfterShip-Altenatives-9.png)


