
Have you ever thought of using Shopify returns, but have no idea how it works?
You can actually learn the entire process and set it up in less than an hour. That is... if you have the right guide to walk you through everything.
We've been helping Shopify store owners optimize their return processes for years. Just last year, we helped one of our clients improve their revenue by 56% and increase their efficiency by 140%.
In this article, we'll show you how to set up return policies, process returns manually, share some useful tips on handling returns, and also share a tool that can make return management way easier for you.
Understanding Shopify Returns
Shopify returns are when a customer sends back a purchased product from a store built on Shopify for a refund, exchange, or store credit.
Your main task as a store owner is to make it simple and retain them through exchanges. Because an efficient returns management system should positively affect customer trust and your revenue.
One of our clients used to lose a lot of customers because their return process was a complete mess. It took them 2-3 weeks to settle one return (too long!).
But after they fixed it with the help of our app, the processing time dropped to 3-5 days. And their repeat purchase went up by 35%! Customers were happy with the fast action, so they gave our client a second chance, and some even recommended the brand to their peers.
Shopify's Return Management Tools
With Shopify's return management features, you can customize your policies, set up return rules, manage return shipping, and process refunds and exchanges.
Shopify allows two ways of handling returns: manually through your admin dashboard and self-service for your customers.
The manual process is better for high-value products that need to be verified, or if you want more control over what gets returned. Self-serve option works best if you want to save time and if you're selling more "everyday" products that don't need much monitoring.
But before you can use any of these tools, you need a solid return policy. We'll show you how to create one next.
Setting Up Your Shopify Return Policy
Here's how you can create and publish a detailed Shopify return policy:
1. Crafting a Clear and Concise Return Policy
A clear and concise return policy tells your customers exactly what they can return, when they can return it, and who pays for shipping. You don't have to write a 2,000-word document for this.
Here are the elements you have to include:
- Return window: Will you accept returns for 30, 60, or 90 days?
- Condition requirements: Is it only for new, unworn, or unused items?
- Non-returnable items: What can't your customer return (i.e., final sales, custom products, high-value products)
- Return shipping costs: Who will shoulder the shipping fees? Will it be free return shipping?
- Refund or exchange options: Will you offer money back, store credit, or exchanges?
It's also important to write these in simple language. Take L.L. Bean's return policy as an example.
They made sure that no jargon was used. So it's super easy to understand.
L.L. Bean also mentioned who handles the shipping costs and how long the refunds take. You have to disclose this info right away so your customers won't have to contact support to ask. That can add some friction to the customer experience and discourage them from making the purchase in the first place.
2. Publishing Your Return Policy on Shopify
Okay. Now that you've written your return policy, it's time to publish it on your Shopify store. Luckily, it's super easy to do. You just have to follow these steps:
- Log in to your account on the Shopify platform.
- Go to "Settings" and click "Policies."
- Click "Return and refund policy" under the "Written policy" section.
- A pop-up will appear, and you can copy and paste your policy here.
- Use the rich text editor if you want to add some style, links, and images.
- Review everything and click "Save."
Shopify will add the return policy link in your checkout footer automatically. But we suggest that you include the link to your main site footer, product pages, and order confirmation emails. You can even add one under the "add-to-cart" button. That way, your customers will spot it no matter where they look.
PRO-TIP: Always stick to your return policy.Because when you do, your customers will see you as "the brand that keeps their word." It will be easier for them to trust you and buy again. Plus, doing this will protect you from any legal disputes.
Shopify's Built-in Return Features
Shopify allows you to initiate manual returns and also activate self-serve returns for your customers.
1. Initiating Manual Returns in Shopify
If a customer contacts your team and asks for a return, here's what you can do to process it manually.
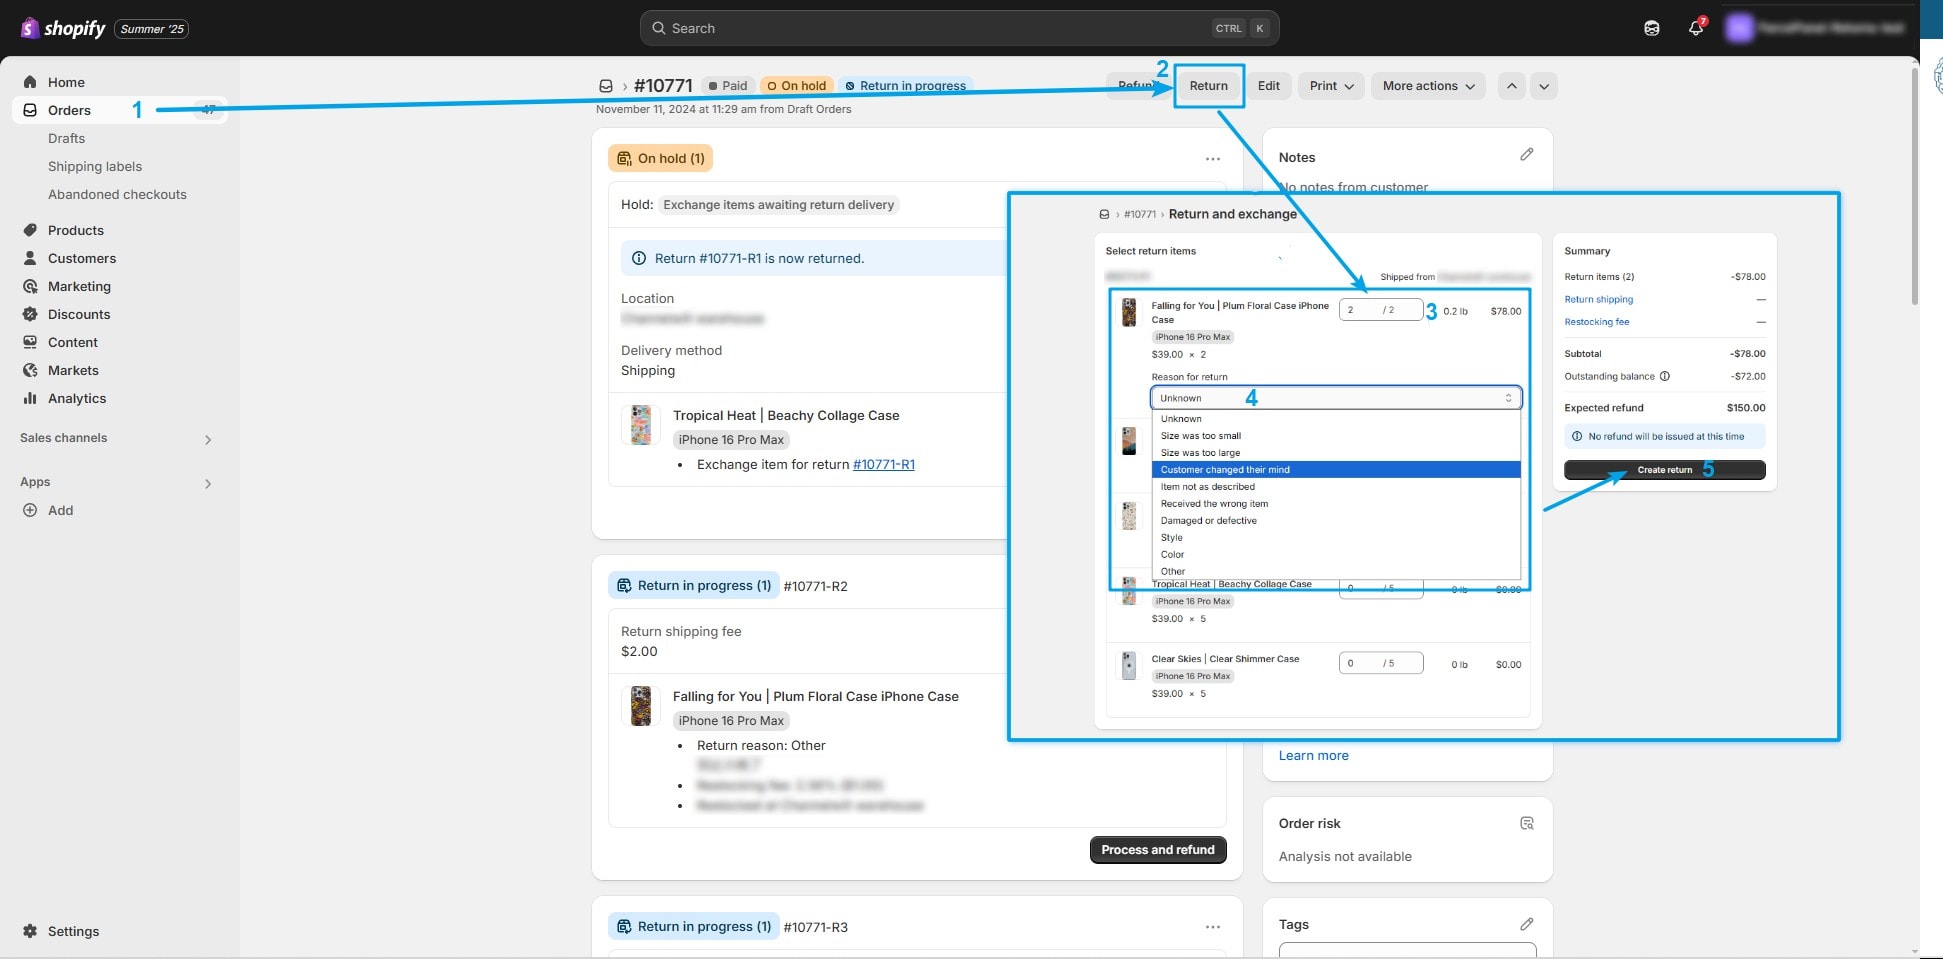
Go to "Orders" in your Shopify admin and find the specific order you need. Once you're on the order details page, look for the "Return" button.
Inside this page, pick the item under the "Select return items" section. You can adjust the quantity using the dropdown box. Then, choose a return reason from the available options.
If you want to add a restocking fee, just click it under the "Summary" part and choose a percentage. Shopify will automatically deduct it from the total refund.
Double check everything and select "Create return." That's it!
Shopify Return Example
Let's say that your customer named Eric bought three $30 iPhone cases from your store. He wanted to refund one of them because there's a crack on the side.
You'd go to Eric's order, click Return, select the iPhone case, change the quantity to one, and pick "damaged or defective" as the return reason.
Since it's a quality issue (and not Eric's fault), you wouldn't add a restocking fee. Once you clicked "Create return," Eric would get his return instructions and Shopify would process the $30 refund.
PRO-TIP: Add internal return reasons so you'll have a better idea of why customers are returning specific products. For example, instead of the simple "damaged or defective," you can add "quality issue: cracked case from supplier [name] batch [number]." So, when you order from that supplier again, you can reference this data and ask them to improve their quality control process.
2. Enabling Self-Serve Returns for Customers
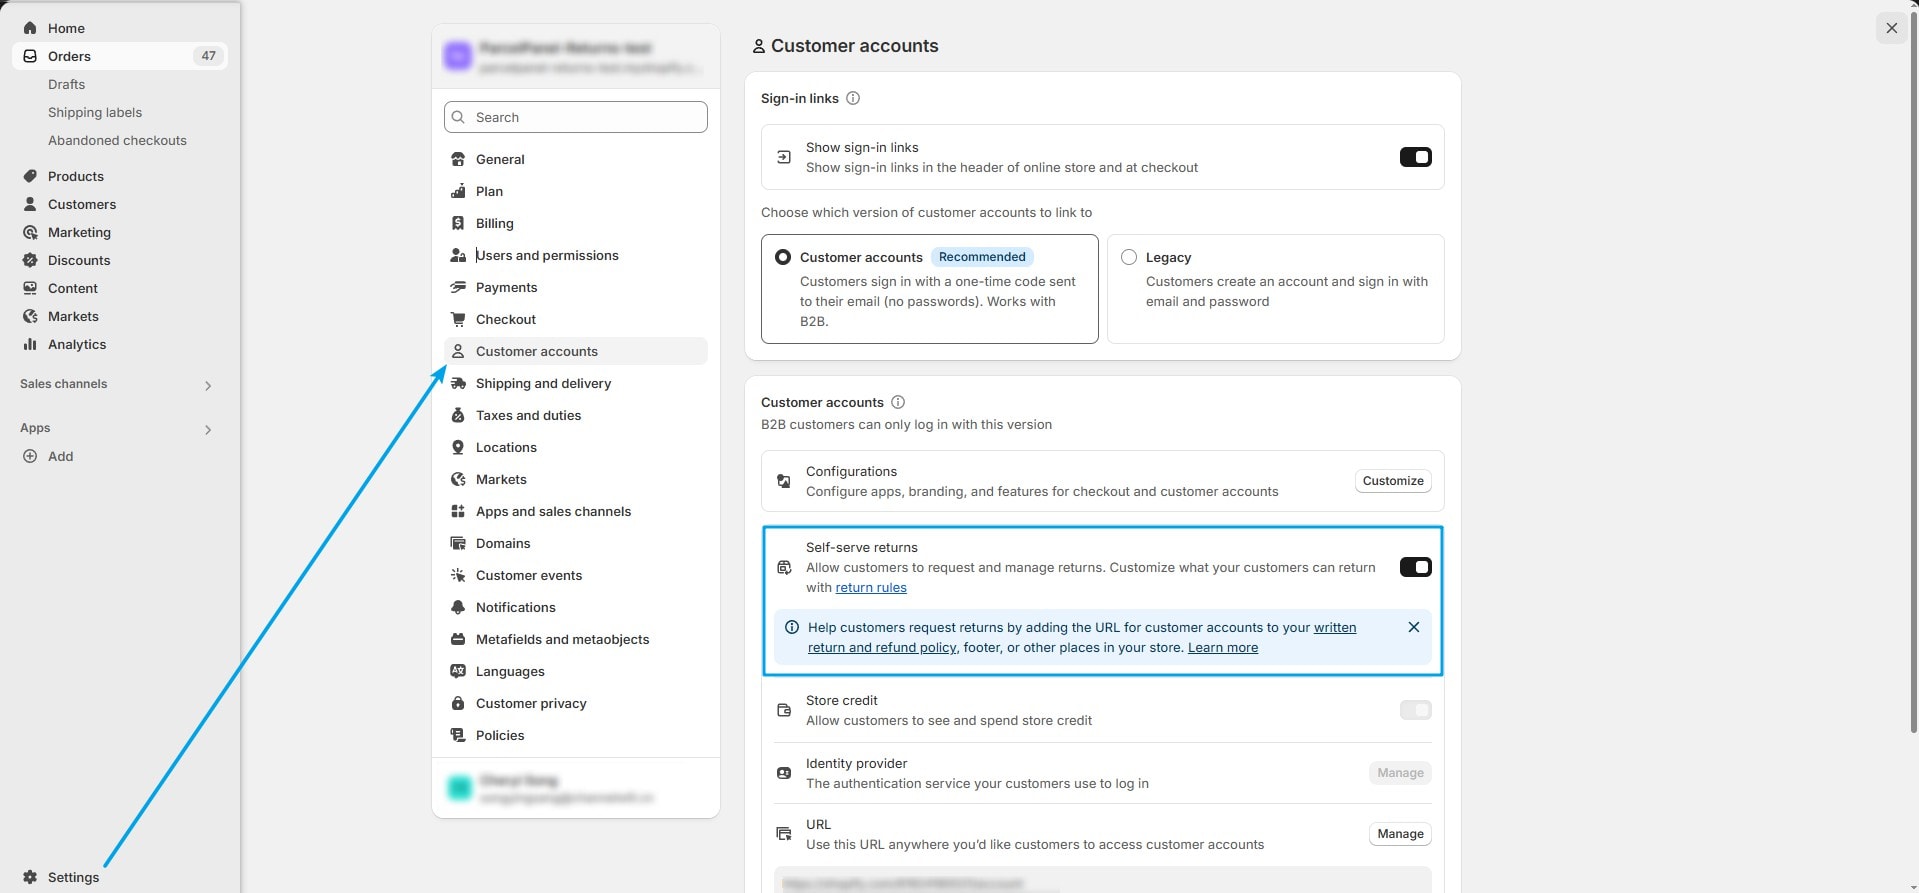
What we love about self-serve returns (besides efficiency) is that it can reduce your support tickets and decrease customer service costs. And since 67% of customers prefer self-service due to convenience and control, it can also improve customer satisfaction.
That's only possible if you offer a user-friendly and well-designed portal. Our ParcelWILL (formerly ParcelPanel) Returns and Exchanges' app can help you with that. You can create a branded return experience for your customers and also set up automated workflows that approve certain returns instantly.
Plus, you get detailed analytics to track return patterns and multiple refund options like store credit or gift cards.
How Can Customers Use Shopify's Self-Serve Returns Feature
Let's say I'm the customer here. I can easily start the returns process by logging into my account on your store. I'd go to my order history, find the item I want to return, and click the "Return items" button.
I'd select which products to send back, choose my reason (like "size was too large" or "changed my mind"), and pick whether I want a refund or store credit. It wouldn't take me more than five minutes for this process. Plus, no multiple message exchanges in between.
3. Managing Return Requests and Approvals
If you choose to manually review return requests, you have to create your own SOP (standard operating procedure). So, your team can follow one process and they can be more efficient.
Here's our suggested steps for merchants:
- Verify your customer's order: Check the order number and ask for proof of purchase.
- Check your return policy: See if the return is eligible based on the return window and the item's condition.
- Process the return: Once you know if it's acceptable, you can start processing it inside your Shopify admin.
- Send confirmation to your customer: Send an email or SMS stating whether the return is approved or not. Provide all the info or instructions that your customer needs for smooth processing.
This is how the process looks. Let's say Ian and Anna both ordered tumblers from your store, but Anna's was custom-engraved. After 10 days, they both requested refunds. Your team approved Ian's return (unused item and within policy) and sent him a confirmation email with return label instructions.
But Anna's request was declined because customized items are non-returnable. So, your team sent an email explaining this policy and offered her a 15% discount on her next order.
PRO-TIP: Always explain declined returns with specific policy references instead of saying "it doesn't qualify". This will help your customers understand your decision better and minimize negative reviews.
Processing Refunds on Shopify
1. Issuing Full and Partial Refunds
Processing full and partial refunds is pretty simple with Shopify. Here's what you can do to issue a refund for the entire order:
- Inside your Shopify admin, go to Orders.
- Choose the order and click the "Refund" button.
- Then, select the quantity of all items.
- Type the reason for refund (for future references)
- Then, select "Refund."
The process is similar for partial refunds. But if you want to learn more about the step-by-step and some useful tips, we wrote a separate article about Shopify partial refund.
Understanding Refund Timelines and Payment Methods
Here's what you need to remember: Shopify automatically sends refunds back to the original payment source, whether that's a credit card, PayPal, or another method. The money goes out in the same currency, too.
Processing fees (i.e., credit card fees) can't be refunded, especially if you used Shopify Payments. Plus, refunds usually take 2-3 days to process. But third-party payment gateways can take longer.
2. Handling Negative Balances from Refunds
Negative balances happen when you process more refunds than what's available in your Shopify Payments account. Shopify still allows refunds, but customers won't get their money until you clear the balance. These show up as "Refund pending" on your Orders page.
PRO-TIP: Remember to check your account balance before processing any refunds. You can also wait for more sales to come in, so you don't make your customers wait too long for their refund.
Managing Exchanges on Shopify
1. Facilitating Product Exchanges
Here's how exchanges work in Shopify: When processing a return, you add the new item they want in the "Exchange items" section.
If the new item costs more, you can send an invoice to your customer to charge what they owe you. But if it costs less, you issue a partial refund for the difference.
You won't have to worry much about the inventory. After the exchange, you can simply choose where to restock the returned item from the "Restock at" dropdown. Then ship out the exchange item just like any regular order from your "Unfulfilled" section.
2. Using Store Credit for Exchanges
If you want to avoid losing revenue from returns, we suggest using store credit as a better alternative to cash refunds. Your customer gets back the full value of their return, but they can only spend it in your store (nice deal!).
Shopify allows you to issue store credit directly to any customer's account, and it shows up in their profile. So, when they shop again (or decide to exchange), they can use it as their payment method.
What we love about store credit is that it keeps that return money in your business instead of disappearing into your customer's bank account. Or using it to buy from another store. And since store credit feels more like a "token" or "reward", it'll definitely encourage your customers to buy once more from your store.
Optimizing Your Shopify Returns Management
1. Streamlining the Returns Workflow
The best way to handle more returns without hiring more staff is to automate as much of the process as possible.
You can do that by setting up return rules that auto-approve certain requests. For example, green light all clothing returns under $50 within 30 days.
You can also automate return notifications, so customers get updates when you receive their package, process their refund, or approve an exchange.
PRO-TIP: Send a confirmation email immediately when someone requests a return. You can also update them once you receive their package. Then notify them again when their refund is successful.
Now, to make sure that your customers have a smooth return process, use your return dashboard to track everything.
Also, check which products get returned most often and how long each step takes. Let's continue to discuss this part below.
2. Analyzing Return Data and Trends
So what should you do with the return reasons and data you collect? Well, you can use them to improve your products and prevent future returns from happening.
Your return dashboard breaks down the numbers in useful ways. You can see return rates by product, common reasons customers give, and which items get returned most often.
We also suggest that you look for patterns like "this sweater always comes back for being too small" or "customers return this phone case because it doesn't fit their model."
Sort your data by time periods (monthly works best) to find serious and recurring issues about your product. So if one product, which received the most positive reviews, suddenly starts getting more returns, then something's not adding up.
Now, here's how you can use this data to increase sales. Let's say your blue dress has a 30% return rate, mostly for "doesn't match photos." Instead of ignoring it, you update the product photos with better lighting and add size measurements. Your returns drop to 10% (nice!), and sales went up because now it matches what's in the picture.
3. Turning Returns into Exchanges or Sales
The best way to turn your returns into sales (instead of a loss) is to offer your clients exchanges or store credit. And you can do that in these simple ways:
- Make them the top two options before "refund."
- Offer some incentives like +10% on store credit or free shipping on exchanges.
- Provide multiple exchange options like mail returns or in-store swaps.
One of our clients started offering a 10% bonus credit for exchanges instead of refunds. Their return-to-exchange rate jumped from 20% to 45% in just two months. The owner told us customers loved getting that extra value, and it's a win-win for them.
If you commit to a smooth and appealing exchange process, buyers will remember that positive experience and come back for more purchases. They're also more likely to recommend your store to friends because they trust you'll handle any issues fairly.
Leveraging Shopify Apps for Advanced Returns Management
Why Use a Shopify Returns App?
Shopify's native return feature is usable for new businesses as it is simple and allows you to process manual returns. But it has a lot of limitations. For example, you can't do much automation and customization, create different rules for products, or collect data from the returns.
The good news? There are many Shopify apps that can provide you with more advanced tools. For example, return management apps allow you to automate approvals, create branded return portals, offer flexible exchange options, and more.
In short, they give you better control over customer experience.
Key Features of ParcelWILL Returns and Exchanges
One Shopify app that you should try is ParcelWILL Returns and Exchanges. You can enjoy many of our app's features and, of course, the benefits it offers, such as:
- Branded return page: Create a custom portal that matches your shop's design instead of using Shopify's plain interface.
- Automated return labels: Generate printable return labels and QR codes for customers when your carrier supports it.
- Automated return notifications: Send return status emails to customers so they know what's happening with their request.
- Multiple refund methods: Offer original payment refunds, store credit, gift cards, or direct exchanges.
- Customizable return policies: Set different rules for different products and auto-approve some return requests.
- AI-powered analytics: Track which items get returned the most and find ways to save revenue.
These features work together to improve customer satisfaction, your team's efficiency, and the return process itself. For example, when your return page is responsive and looks like a part of your store, your customers will feel more comfortable using it.
Plus, the automated approval works well if someone is requesting a simple exchange or return. You won't have to bother your team for teeny-tiny decisions like approving a $20 t-shirt return that's clearly within your policy.
And what's more awesome is how easy you can use ParcelWILL with your other tools. Our app can connect with over 1,400 carriers and 50+ popular apps. That's why we are trusted by over 50K brands.
Final words
Now you have all the pieces (knowledge plus tools) to build a return system that actually works. You've learned how to write policies, set up Shopify's return features, and automate workflows.
Remember that a solid returns system can help you:
- Build customer trust and loyalty
- Reduce support tickets and manual work
- Turn potential losses into exchanges and repeat sales
Don't let another week pass by with the same inefficient return process. Your customers (and your support team) will thank you for switching to a better one.
Install the ParcelWILL app on your Shopify store now.
Shopify Returns FAQs
How do returns work with Shopify?
You can handle returns on Shopify inside your admin dashboard, where you approve requests, issue refunds, and create return labels. Customers can also either contact you directly or start returns themselves using a self-service portal.
Does Shopify take care of returns?
Shopify gives some tools to manage returns, but merchants and store owners (like you) are still responsible for handling the physical process. You'll need to receive returned items, inspect their condition, and decide whether to issue refunds or exchanges.
How do I send a return shipping label on Shopify?
You can go to the "Order" tab in your Shopify admin, click "Return," and select "Create a return label in Shopify" in the Return shipping options part. But this only works for US domestic addresses. You'll need to use a third-party service or get labels directly from shipping carriers like UPS or FedEx for international orders.
Does Shopify have a return portal?
Yes. Shopify has a self-serve return portal where your customers can start their own returns. But it's not as comprehensive as return management apps like ParcelWILL Returns & Exchanges.


![Top 10 Route Alternatives & Competitors [2026]](https://blog.parcelpanel.com/wp-content/uploads/2025/11/Route-Altenatives.png)

![Top 10 parcelLab Alternatives & Competitors [2026]](https://blog.parcelpanel.com/wp-content/uploads/2025/11/AfterShip-Altenatives-9.png)


